Thursday, November 8, 2012

Thankful Turkey 2012

SO... I Have been away for a long time... I have all these great ideas for blog post, but cant seem to find the time to do anything! But I have time today.... I was on pinterest yesterday and found some great activities for the kiddos. But my favorite is a thankful turkey, Which I pulled from a couple different sites to make it my own. 
So the Initial Idea was from this post on pinterest! I hope the link works, I am not trying to take credit that is not mine...


http://pinterest.com/pin/52213676901382219/
After sleeping on it. I decided to find a template of a turkey to begin the process! I found a great site that had the turkey template and other animals too! 
http://nate.malamud.com/turkey/paper.html
Please Go check their website. They make it really easy to print what you need and show you how its supposed to go. 

Since I was on my computer I figured I could go ahead and print what I needed onto the color I wanted. Making easy to just cut and paste. 


I also used word documents to print out the lettering I would need! Hope you like it and good luck> My family and I will sit at dinner together and talk about what we will write on our feathers.


Wednesday, September 5, 2012

Cheap and easy Back to school present!!

Back to School 

For all those with children going back to school, I have read a few pinterest ideas with a school fairy. I wanted to do something for my son, but he is five and so over fairies.  Then I had so many extra wipe containers and was looking for a way to repurpose them. Again I hit pinterest again and nothing caught my attention. So then I put my two ideas together and created this .... 
A homework bin!! (I thought it was genius...) I remember as a kid I would find any excuse to get away from my homework, so lets make it impossible. 

NOTE: before you think this is expensive. Its not. I didn't even leave my house!! Last year when they did the back to school sales, I went and stocked up on school supplies. There were no more thasn $5 spent to make this box (including the stickers).

What you need: 
  • Letter sticker sheets (I used blue, grey & red). 
  • An old wipe box 
  • and the contents that you wish to put inside 
    • (I used) A box of colored pencils
    • box of crayons
    • box of markers 
    • a few pencils 
    • sharpener 
    • eraser 
    • scissors (the ones that only cut paper) 
    • and lastly glue 
  • For the wrapping ...
    • celophane 
    • a rubber band
    • ribbon
    • and tissue paper 

Also, the stickers I purchased were found on sale at a warehouse sale for Prima. They were super cheap so if your ever out shopping and find some cheap stickers just pick them up. I have used these same stickers for 3 projects already! 
Here are the steps to make the back to school box:

  1. Gather your supplies 
  2. Take your wipe box and pop the lid off (I saved it, I have a feeling at some point all the boxes will end up missing or in shreds).
  3. Next grab all your stickers and start placing randomly, whatever looks good to you. 

    1. I decided to put his name, hoping he will use it to learn writing his name.
  4. Next I placed a yellow green piece of tissue paper on the bottom to make it look like a present.
  5. add the contents to the box, make it presentable. 

  6. Next wrap it in cellophane, use the rubber band to tie it up
  7. Lastly, put a nice ribbon on it and your done! 

Friday, August 24, 2012

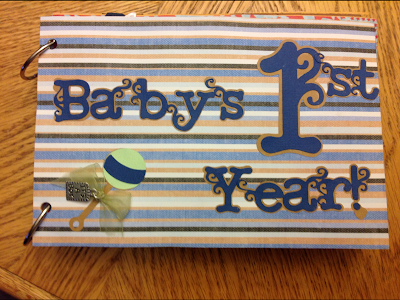
Baby's First Year Photo Book with Sotrage

Baby's First Year Photo Album

My First blog post ever, so bare with me....
Ok so I got this idea from #pinteres and loved the idea. You use 6x9 envelopes (which I purchased at the dollar  tree). When the book is done you will be able to have a book filled with pictures of the little one and any picture CDs or extra prints can go in the pockets. 

To begin I used ...
  • Cricut expression 2 machine 
  • lots of scrapbook paper 12x12 
  • scissors
  • paper cutter
  • A whole punch (single would be better, but I only had a 3 ring whole puncher) 
  • Pencil 
  • Glue ( for some reason I preffer using the Elmer's gluestick {purple} I tried craft glue but it kept wrinkling the papers) 
  • 2 rings 
  • And any thing that you are gonna use to embellish your pages
    • I used rub-ons, Stickers, Ribbon, stamps, and rhinestones

I made this book for my cousin as her baby shower gift. I did all the holidays. It begins with his birth date and ends on his birthday.

First: I got the paper and lined it with the envelope (I did it as I wenta along but I just realized its a 12x12 paper and the envelope is 6X9 so you can probably pick out all the papers you are going to use and cut all the papers in half), This is where the paper cutter comes in.


Second: I placed the glue on the front of the envelope and pasted my paper on it. 

Third: I turned the envelope up and marked a line around the envelope seal. I then used my scissors and cut the top whee we drew the line.


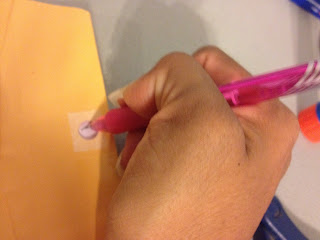
Fourth: Lay it flat again and with your pencil shade where the hole is for the prongs. Mine where a little off but it worked perfectly. Then using your whole puncher (again I used a 3 ring one- I removed the bottom so I could line up the shading witht the whole puncher) Once that is done fold the seal down and place glue on it then fold the paper down and pull a little. **IT doesn't have to be perfect. When I could see a little yellow, I used my scissors and trimmed it... no one will know.

Fifth: Now the back of the envelope is shaped like a trapezoid so to make it easy on myself i just cut a straight line on the paper. Again no one will know.This is the easy part. paste and continue. 

Sixth: Now for the bottom holes where the rings will go. The first one is the easiest just center it and make your wholes. The ones that follow use the one before and with you pencil shade it in so that youy can make the wholes in the same place. This will allow your book to be even!

Here is my book ... Hope you like it!


My personal favorite are the Thanksgiving and Christmas pages.
My Least Favorite would have to be New Years. I just couldn't think of anything cute for a baby. 


After 2-3 envelopes it Becomes easy! I realize now that if you do one task at a time it be easier. GOOD LUCK!